Content Menu
● Why Choose DIY Disposable Lunch Boxes for Parties?
>> Convenience and Effortless Clean-Up
>> Customization and Personal Touch
>> Portability and Portion Control
>> Eco-Friendly Options
● Choosing the Right Materials for Your DIY Disposable Lunch Box
>> Paper and Cardboard
>> Aluminum Foil
>> Compostable or Recyclable Plastics
>> Repurposed Containers
● Step-by-Step Guide: How to Make a DIY Disposable Lunch Box
>> Step 1: Gather Your Supplies
>> Step 2: Design and Cut
>> Step 3: Assemble the Box
>> Step 4: Line the Box
>> Step 5: Fill and Decorate
● Creative Ideas for Customizing Your DIY Disposable Lunch Box
>> Themed Decorations
>> Personalized Touches
>> Compartmentalization
>> Eco-Friendly Embellishments
● Menu Planning for DIY Disposable Lunch Boxes
>> Sandwiches and Wraps
>> Salads and Sides
>> Desserts
>> Utensils and Extras
● Tips for Assembling DIY Disposable Lunch Boxes for Large Parties
● Eco-Friendly Considerations
● Presentation and Serving Ideas
● Common Mistakes to Avoid
● Conclusion
● FAQ
>> 1. What are the best materials for making a diy disposable lunch box?
>> 2. How far in advance can I assemble diy disposable lunch boxes?
>> 3. Can I use diy disposable lunch boxes for hot foods?
>> 4. How can I make my diy disposable lunch box more eco-friendly?
>> 5. What foods are best suited for diy disposable lunch boxes?
Hosting a party is always exciting, but it comes with its own set of challenges-especially when it comes to serving food. One of the most practical, creative, and memorable solutions is to prepare custom disposable lunch boxes for your guests. These boxes not only streamline food service but also add a personalized flair that can elevate any gathering, from birthdays and weddings to picnics and corporate events. In this comprehensive guide, you'll discover how to design, assemble, and decorate your own diy disposable lunch box for parties, ensuring your event is both stylish and stress-free.
Why Choose DIY Disposable Lunch Boxes for Parties?
Convenience and Effortless Clean-Up
Disposable lunch boxes make food service at parties incredibly efficient. Instead of managing a buffet line or washing countless dishes, you can simply hand out ready-to-eat meals. When the party winds down, clean-up is as simple as collecting the used boxes and disposing of them, freeing you to enjoy more time with your guests.
Customization and Personal Touch
With diy disposable lunch boxes, you can tailor each box to match your event's theme, color palette, or even personalize them with each guest's name. This thoughtful detail not only enhances the aesthetic of your party but also makes each attendee feel special and appreciated.
Portability and Portion Control
Each guest receives a neatly packed meal, making it easy to serve and transport food-especially useful for outdoor events or occasions where guests might want to take leftovers home. Portion sizes are easy to manage, ensuring everyone gets a balanced meal without waste.
Eco-Friendly Options
Many diy disposable lunch box materials are biodegradable or compostable. By choosing paper, cardboard, or eco-friendly plastics, you can minimize your environmental impact while still enjoying the convenience of disposables.
Choosing the Right Materials for Your DIY Disposable Lunch Box
Paper and Cardboard
Paper and cardboard are the most popular choices for diy disposable lunch boxes. They are lightweight, easy to cut and decorate, and available in a variety of sizes and shapes. Always choose food-grade materials to ensure safety and durability.
Aluminum Foil
Aluminum foil containers are sturdy and retain heat well, making them ideal for hot or saucy foods. They can be easily customized with decorative lids, wraps, or labels, and are simple to dispose of after use.
Compostable or Recyclable Plastics
If you need a moisture-resistant option, compostable or recyclable plastic containers are a great choice. These are especially useful for salads, fruits, or dishes with dressings, and they align with eco-conscious event planning.
Repurposed Containers
For a unique and sustainable touch, consider repurposing clean food containers such as yogurt cups or takeout boxes. This reduces waste and adds a quirky, personalized element to your diy disposable lunch box project.

Step-by-Step Guide: How to Make a DIY Disposable Lunch Box
Step 1: Gather Your Supplies
- Food-grade paper plates, cardboard, or aluminum containers
- Scissors, ruler, pencil, and adhesive (glue, tape, or stapler)
- Decorative paper, stickers, or ribbon for customization
- Wax paper or parchment for lining
- Optional: Custom labels, tags, or printed menus
Step 2: Design and Cut
If you're crafting your boxes from scratch, start by tracing and cutting the base and sides from paper or cardboard. For a simple box, cut a large rectangle for the base and smaller rectangles for the sides. Fold the sides up and secure them to the base using glue, tape, or staples.
Step 3: Assemble the Box
Fold the sides along the scored lines and attach them to the base, reinforcing corners for added strength. If you're using pre-made containers, focus on customizing the exterior with decorative elements.
Step 4: Line the Box
Place a sheet of wax or parchment paper inside the diy disposable lunch box. This lining keeps food fresh and prevents grease or moisture from seeping through the box.
Step 5: Fill and Decorate
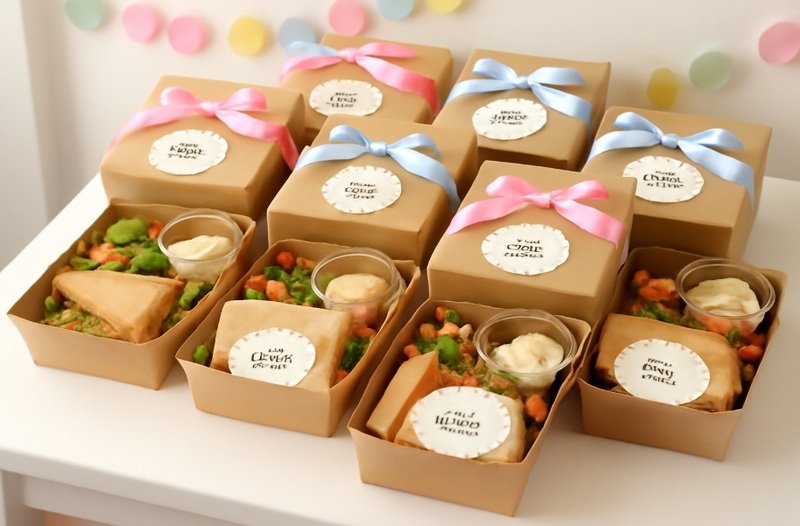
Arrange your chosen foods neatly inside the box. Add utensils wrapped in napkins, and finish with a ribbon or personalized label. If desired, include a small note or menu card for an extra special touch.
Creative Ideas for Customizing Your DIY Disposable Lunch Box
Themed Decorations
Coordinate your diy disposable lunch box with the party's theme. Use colored paper, themed stickers, or printed labels that reflect the occasion-whether it's a birthday, wedding, picnic, or holiday celebration.
Personalized Touches
Add each guest's name or a special message to their box. Personalization can double as a place card and makes everyone feel uniquely welcomed.
Compartmentalization
Divide the box into sections using cupcake liners, small cups, or folded paper to separate different foods. This keeps items fresh and prevents flavors from mixing.
Eco-Friendly Embellishments
Decorate with biodegradable twine, recycled paper, or plant-based stickers. This maintains the eco-friendly aspect of your diy disposable lunch box while still looking festive.
Menu Planning for DIY Disposable Lunch Boxes
Sandwiches and Wraps
Choose sturdy sandwiches or wraps that hold up well in a box. Pre-cut them for easy eating and consider wrapping them in parchment for a polished look.
Salads and Sides
Pack salads in small containers or use cupcake liners for portioned sides like chips, fruit, or veggies. This keeps everything organized and fresh.
Desserts
Include a sweet treat such as cookies, brownies, or fruit cups. Place desserts in a separate compartment or wrap them in parchment to prevent them from getting soggy.
Utensils and Extras
Don't forget to include napkins, utensils, and condiments. Wrap utensils in a napkin and secure with a ribbon for a neat presentation.
Tips for Assembling DIY Disposable Lunch Boxes for Large Parties
- Do a Test Run: Assemble a sample box to ensure everything fits and looks appealing.
- Prepare in Advance: Assemble boxes the night before and refrigerate if they contain perishable items.
- Label Clearly: Use labels or tags to indicate dietary preferences or allergies.
- Stack and Store Efficiently: Keep boxes in a cool place or refrigerator until serving time.
- Delegate Tasks: Enlist help from friends or family to streamline the assembly process.
Eco-Friendly Considerations
When making diy disposable lunch boxes, opt for biodegradable or compostable materials whenever possible. Avoid single-use plastics, or choose plant-based plastics that break down more easily. Encourage guests to recycle or compost their boxes after use, and consider providing clearly marked bins at your event.
Presentation and Serving Ideas
Display your diy disposable lunch boxes on a decorated table or in baskets for guests to grab as they arrive. For outdoor events, use coolers or insulated bags to keep food fresh. Add a festive touch with banners, flowers, or themed props around the serving area to enhance the party atmosphere.
Common Mistakes to Avoid
- Overfilling Boxes: Leave enough space for the lid to close securely without squishing the food.
- Ignoring Food Safety: Keep perishable foods chilled until serving to prevent spoilage.
- Using Weak Materials: Choose sturdy paper or containers to prevent leaks and spills.
- Skipping Labels: Always label boxes with contents and guest names for easy distribution and to accommodate dietary needs.
Conclusion
Creating diy disposable lunch boxes for parties is a fun, practical, and memorable way to serve meals. With endless options for customization, eco-friendly materials, and easy assembly, these lunch boxes can transform any event into a stylish and organized affair. Whether you're hosting a picnic, birthday, wedding, or office gathering, a diy disposable lunch box ensures convenience, creativity, and sustainability. Your guests will appreciate the thoughtful presentation, and you'll enjoy a stress-free party with minimal clean-up.

FAQ
1. What are the best materials for making a diy disposable lunch box?
The best materials are food-grade paper, cardboard, or compostable plastics. Aluminum containers are also suitable, especially for hot foods. Always choose sturdy materials to prevent leaks and ensure safe food handling.
2. How far in advance can I assemble diy disposable lunch boxes?
You can assemble them the night before your event. Store them in the refrigerator if they contain perishable items. Non-perishable boxes can be prepared even earlier and kept at room temperature.
3. Can I use diy disposable lunch boxes for hot foods?
Yes, but choose containers that can withstand heat, such as aluminum or thicker cardboard. Always line the box with parchment or wax paper to prevent sogginess and leaks.
4. How can I make my diy disposable lunch box more eco-friendly?
Use biodegradable or compostable materials, avoid single-use plastics, and repurpose containers when possible. Encourage guests to recycle or compost their boxes after use.
5. What foods are best suited for diy disposable lunch boxes?
Foods that travel well and don't require reheating are ideal. Sandwiches, wraps, salads, fruits, chips, and baked goods all work well. Avoid foods with excessive liquid unless using leak-proof containers.


