Content Menu
● Basic Materials Needed
● Simple Plate and Cup Method
>> Step-by-Step Instructions
● Elevated Design: Dollar Store DIY
>> Materials:
>> Instructions:
● Upcycled Vintage Look
>> Materials:
>> Instructions:
● Paper Plate Cake Stand for Parties
>> Materials:
>> Instructions:
● Tiered Cake Pop Stand
>> Materials:
>> Instructions:
● Creative Decorating Ideas
● Tips for Use and Care
● Versatile Uses for Cake Stands
● Eco-Friendly Alternatives
● Safety Considerations
● Conclusion
● FAQ
>> 1. How much weight can a disposable cake stand hold?
>> 2. Can I make a waterproof cake stand for outdoor events?
>> 3. How do I prevent my tiered cake stand from wobbling?
>> 4. Are these DIY cake stands reusable?
>> 5. Can I use these methods to make a cake stand for a wedding cake?
● Citations:
Creating a disposable cake plate stand is a simple and fun DIY project that can add a touch of elegance to any gathering, whether it's a birthday party, wedding, or casual get-together. This guide will walk you through various methods to make your own disposable cake plate stand using easily available materials.
Basic Materials Needed
To create your disposable cake plate stand, gather the following materials:
- Disposable plates: Choose sturdy ones that can support the weight of your cake or desserts.
- Disposable cups: These will act as the base for your cake stand.
- Super glue or E6000: A strong adhesive is essential for ensuring stability.
- Optional decorations: You can use washi tape, decorative paper, or spray paint to enhance the appearance of your stand.
Simple Plate and Cup Method
Step-by-Step Instructions
1. Clean and dry all materials thoroughly.
2. Apply a thin layer of super glue or E6000 to the rim of the disposable cup.
3. Center the cup on the bottom of the disposable plate and press firmly.
4. Allow the glue to set for a few minutes until tacky.
5. For a multi-tiered stand, repeat the process with additional cups and plates.
6. Let the stand dry completely for at least an hour, preferably overnight.
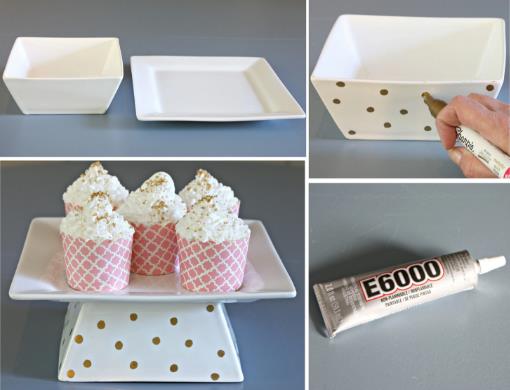
Elevated Design: Dollar Store DIY
For a more elegant look, try this method using materials from your local dollar store:
Materials:
- Serving dish
- 2 candle holders
- E6000 glue
- Spray paint (optional)
Instructions:
1. Clean all items thoroughly.
2. If desired, spray paint the pieces to match your color scheme.
3. Apply E6000 glue to the rim of one candle holder.
4. Attach the second candle holder on top and let dry overnight.
5. Once dry, apply glue to the top of the candle holder structure.
6. Center and attach the serving dish on top.
7. Allow to dry completely before use.
Upcycled Vintage Look
Create a charming vintage-inspired cake stand using thrifted materials:
Materials:
- Vintage plate
- Old candlestick or vase
- Strong adhesive (E6000 or glass glue)
Instructions:
1. Clean and dry both the plate and base thoroughly.
2. Apply adhesive to the top of the candlestick or vase.
3. Center the plate on top of the base.
4. Allow to dry for 24 hours before use.
Paper Plate Cake Stand for Parties
For large gatherings or children's parties, try this quick and disposable option:
Materials:
- Patterned paper plates
- Paper cups
- Hot glue gun
Instructions:
1. Choose paper plates and cups with complementary designs.
2. Apply hot glue to the bottom rim of the cup.
3. Center the cup on the bottom of the paper plate and attach.
4. Let cool completely before use.

Tiered Cake Pop Stand
For a unique display of cake pops or small desserts, create a tiered stand:
Materials:
- Styrofoam discs of varying sizes
- Wooden dowels
- Decorative paper or paint
- Hot glue gun
Instructions:
1. Cover styrofoam discs with decorative paper or paint them.
2. Insert wooden dowels into the largest disc to support the next tier.
3. Stack the discs, securing each layer with hot glue.
4. Insert cake pop sticks or toothpicks for holding treats.
Creative Decorating Ideas
Once you've created your cake stand, consider these decorating options:
1. Washi Tape Border: Apply colorful washi tape around the edge of each tier for a pop of color.
2. Floral Accents: Attach artificial flowers or greenery to the base or between tiers for a garden-party feel.
3. Ribbon Wrap: Wrap ribbon around the base of each tier, securing with double-sided tape.
4. Glitter Edge: Apply a thin line of glue around the edge of each tier and sprinkle with glitter for a sparkly touch.
5. Chalkboard Paint: Paint the top of the stand with chalkboard paint to write personalized messages.
Tips for Use and Care
- Stability: Ensure that each layer is centered properly to maintain balance.
- Weight Distribution: Place heavier items on the bottom tiers and lighter ones on top.
- Cleaning: For non-disposable stands, hand wash gently and dry thoroughly after each use.
- Storage: Store multi-piece stands disassembled to prevent damage.
Versatile Uses for Cake Stands
Your DIY cake stands can be used for more than just displaying cakes:
1. Dessert Bar: Create a tiered display for various desserts like cupcakes, cookies, and fruit tarts.
2. Appetizer Presentation: Use for presenting cheese platters, canapés, or other finger foods.
3. Craft Supply Organization: Organize small craft supplies like beads, buttons, or paint bottles.
4. Bathroom Organizer: Display toiletries, perfumes, or makeup in an elegant manner.
5. Plant Stand: Showcase small potted plants or succulents for an indoor garden look.
6. Jewelry Display: Use as a tiered organizer for necklaces, bracelets, and rings.
7. Holiday Decor: Create seasonal displays with ornaments, candles, or festive figurines.
Eco-Friendly Alternatives
For those concerned about sustainability, consider these eco-friendly options:
1. Biodegradable Materials: Look for plates and cups made from bamboo or other compostable materials.
2. Reusable Options: Invest in washable melamine or plastic plates that can be used multiple times.
3. Upcycled Materials: Repurpose old dishes, candlesticks, or even books to create unique stands.
Safety Considerations
When making and using your DIY cake stands, keep these safety tips in mind:
1. Food Safety: If using non-food-grade materials, place a food-safe liner on the plate before adding edibles.
2. Stability Testing: Before adding food, test the stability of your stand by gently pressing on different areas.
3. Child Safety: For children's parties, consider using shatterproof materials to prevent accidents.
4. Glue Selection: Choose food-safe adhesives if there's any chance of contact with edibles.
Conclusion
Creating your own disposable cake plate stand is an easy, cost-effective way to elevate your dessert presentation at any event. With just a few materials and some creativity, you can craft a functional and attractive display that impresses your guests. Whether you opt for a simple design or a more elaborate tiered structure, these DIY cake stands offer a personalized touch to your celebrations while being budget-friendly and versatile.

FAQ
1. How much weight can a disposable cake stand hold?
The weight capacity depends on the materials used. Generally, a single-tier stand made with sturdy disposable plates can hold a lightweight cake or several cupcakes. For heavier cakes, consider using multiple supports or stronger materials.
2. Can I make a waterproof cake stand for outdoor events?
Yes, you can create a waterproof stand by using plastic or melamine plates and cups, and sealing the joints with waterproof silicone adhesive. However, always bring the stand indoors during heavy rain or wind.
3. How do I prevent my tiered cake stand from wobbling?
Ensure each layer is perfectly centered and use a level surface. For added stability, you can use small adhesive rubber feet on the bottom of the base.
4. Are these DIY cake stands reusable?
While designed to be disposable, many of these stands can be gently washed and reused several times, especially if made with sturdier materials. However, their longevity may be limited compared to commercial cake stands.
5. Can I use these methods to make a cake stand for a wedding cake?
For small, lightweight wedding cakes, these methods can work. However, for larger, multi-tiered wedding cakes, it's best to use professional-grade cake stands to ensure safety and stability.
Citations:
[1] https://www.youtube.com/watch?v=AyDhO7yuAvI
[2] https://www.craftynest.com/2008/10/repurposed-cake-stands/
[3] https://www.thekayacollection.com/blogs/news/8-creative-ways-to-use-a-cake-stand
[4] https://www.youtube.com/watch?v=mJdHthNJH7o
[5] https://sugarandcloth.com/diy-cake-stand-ideas/
[6] https://www.stonegableblog.com/fabulous-fun-and-functional-cake-stands-not-just-for-cake/
[7] https://thebearfootbaker.com/diy-cake-stand/
[8] https://abeautifulmess.com/5-temporary-cake-stand-ideas/
[9] https://niftymom.com/2018/07/easy-ways-dress-cake-stand/
[10] https://mycakies.com/2015/05/diy-paper-plate-cake-stands/


