Content Menu
● Materials Needed
● Step-by-Step Instructions
>> Step 1: Prepare the Plate Mold and Paper Mache
>> Step 2: Apply the Paper Mache
>> Step 3: Trim the Plates to Shape
>> Step 4: Remove the Plates from the Mold
● Decorating Your Plates
● Tips for Success
● Common Mistakes to Avoid
● Creative Uses for Your Homemade Plates
● FAQ
>> 1. What materials do I need to make disposable paper plates?
>> 2. How long does it take for the paper plates to dry completely?
>> 3. Can I use these homemade plates for serving hot foods?
>> 4. Are there any safety concerns when using homemade paper plates?
>> 5. What can I do if my disposable paper plates turn out too flimsy?
● Conclusion
● Citations:
Disposable paper plates are a convenient solution for meals on the go, picnics, and parties. They eliminate the hassle of washing dishes and can be easily disposed of after use. Making your own disposable paper plates is not only a fun craft project but also an eco-friendly alternative to store-bought options. This guide will walk you through the process of creating your own paper plates using simple materials and techniques.
Materials Needed
To make disposable paper plates, you will need the following materials:
- Old magazines or newspapers: These will serve as the base material for your plates.
- Flour: This will be used to create the paper mache paste.
- Water: To mix with flour for the paste.
- Plastic wrap: To cover the mold.
- Dinner plates: These will act as molds for shaping your plates.
- Scissors: For trimming the edges of your plates.
- Non-toxic paints or markers (optional): For decorating your plates after they dry.
- Paintbrushes or sponges (optional): For applying paint.
Step-by-Step Instructions
Step 1: Prepare the Plate Mold and Paper Mache
1. Make the Paper Mache Paste:
- Combine 3 parts water with 2 parts flour in a bowl. Mix until you achieve a smooth consistency without lumps. This mixture should be thick enough to coat the paper strips but still fluid enough to dip them easily.
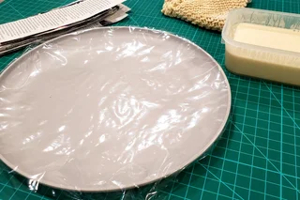
2. Prepare Your Mold:
- Cover a dinner plate with plastic wrap. This will prevent the paper mache from sticking to the plate, allowing for easy removal later. Ensure that the plastic wrap is smooth and tight against the plate to maintain its shape.
Step 2: Apply the Paper Mache
1. Cut Newspaper into Strips:
- Tear or cut your old magazines or newspapers into strips about 2-3 inches wide. You can vary the length depending on how large you want your plates to be; longer strips may provide better coverage.
2. Dip and Apply:
- Dip each strip into the paper mache paste, ensuring it is fully coated but not dripping wet. Lay these strips over the plastic-wrapped plate, pressing them gently to conform to its shape. Overlap each strip slightly to ensure there are no gaps.
3. Layering:
- Continue applying strips until you have at least two layers covering the entire surface of the plate. This will ensure that your plate is sturdy enough for use. For added strength, you can apply three or four layers, especially if you plan to use them for heavier foods.
Step 3: Trim the Plates to Shape
1. Trimming Edges:
- Once you have applied enough layers, use scissors to trim the edges of your plate while it is still damp. This helps prevent cracking when it dries. Aim for a smooth edge that resembles commercial disposable plates.
2. Drying:
- Allow your plates to dry overnight in a warm, dry place. Ensure they are completely dry before attempting to remove them from the mold. You can speed up drying by placing them in a well-ventilated area or using a fan.
Step 4: Remove the Plates from the Mold
1. Careful Removal:
- Gently peel away the plastic wrap from your molded plate. If it sticks, use a small amount of water to help loosen it. Be careful not to tear your newly formed plate during this process.
2. Final Touches:
- Inspect your plates for any rough edges and trim them as necessary. If desired, sand down any uneven areas gently with fine sandpaper for a smoother finish.
Decorating Your Plates
Once your plates are dry and trimmed, you can personalize them with decorations:
1. Painting:
- Use non-toxic paints or markers to add designs, patterns, or even messages on your plates. This is particularly fun for themed parties or special occasions like birthdays or holidays.
2. Stickers and Stamps:
- Consider using stickers or stamps to embellish your plates further. Ensure that any additional materials used are also biodegradable if you're aiming for an eco-friendly product.
3. Sealing (Optional):
- If you want to make your plates more durable or water-resistant, consider applying a thin layer of non-toxic sealant once decorated and dried completely.
Tips for Success
- Ensure that you apply enough layers of paper mache; one layer may not provide sufficient strength.
- Experiment with different shapes and sizes by using various molds such as bowls or larger platters.
- Consider decorating your plates with non-toxic paints or markers once they are dry for a personalized touch.
- If you're making these plates for outdoor events, think about reinforcing them further by using thicker newspaper layers or adding an extra layer of clear sealant after decorating.
Common Mistakes to Avoid
1. Not Enough Layers:
- One common mistake is applying too few layers, leading to flimsy plates that may not hold up under heavier foods.
2. Inadequate Drying Time:
- Rushing the drying process can result in weak plates that may tear easily when removed from their molds.
3. Using Toxic Materials:
- Always opt for non-toxic materials, especially if you're decorating your plates for food use.
4. Skipping Trimming Steps:
- Neglecting to trim edges can lead to sharp points that may be unsafe during use.
5. Ignoring Ventilation During Drying:
- A lack of air circulation can lead to mold growth on damp paper mache if left in humid conditions.

Creative Uses for Your Homemade Plates
Your homemade disposable paper plates can serve various purposes beyond just serving food:
1. Craft Projects:
- Use them as canvases for painting projects with children or as bases for other crafts like collages.
2. Garden Use:
- They can serve as biodegradable plant pots for seedlings; simply poke holes in the bottom for drainage before planting.
3. Party Decor:
- Decorate them elaborately and hang them as part of party decorations or centerpieces.
4. Educational Tools:
- Use them in classrooms for art projects or as tools for teaching shapes and colors in younger grades.
5. Picnic Essentials:
- Perfect for outdoor gatherings where traditional dishes might break; they're lightweight and easy to carry.
Here are five frequently asked questions (FAQ) based on the content of the article about making disposable paper plates:

FAQ
1. What materials do I need to make disposable paper plates?
To make disposable paper plates, you will need old newspapers or magazines, flour, water, plastic wrap, dinner plates (as molds), scissors, and optional non-toxic paints or markers for decoration.
2. How long does it take for the paper plates to dry completely?
The drying time for homemade paper plates typically takes about 24 hours in a warm, dry place. It's important to ensure they are completely dry before removing them from the mold to prevent tearing.
3. Can I use these homemade plates for serving hot foods?
Yes, you can use homemade paper plates for serving hot foods, but it's advisable to limit their exposure to high temperatures. Make sure to apply multiple layers of paper mache for added strength and consider sealing them for better durability.
4. Are there any safety concerns when using homemade paper plates?
When using homemade paper plates, ensure that all materials used (such as paints and adhesives) are non-toxic and safe for food contact. Additionally, be cautious of sharp edges when trimming the plates.
5. What can I do if my disposable paper plates turn out too flimsy?
If your disposable paper plates are too flimsy, you can try adding more layers of paper mache next time or using thicker strips of newspaper during the crafting process. Alternatively, you can reinforce flimsy plates by placing them on a sturdier base when serving food.
Conclusion
Creating disposable paper plates at home is an enjoyable and rewarding project that not only saves money but also promotes recycling and sustainability. With just a few materials and some creativity, you can produce functional and eco-friendly tableware for any occasion—whether it's a casual family dinner, a festive gathering, or an outdoor picnic.
By making these plates yourself, you contribute positively to reducing waste while enjoying a fun crafting experience that can involve family members of all ages!
Citations:
[1] https://www.instructables.com/DIY-Paper-Plates/
[2] https://www.youtube.com/watch?v=HqNcHPJv8oU
[3] https://web.xidian.edu.cn/ysxu/files/6266402e5ec45.pdf
[4] https://askpackagingltd.com/paper-plates-process/
[5] https://www.youtube.com/watch?v=0DQm2b_0mO4
[6] https://manu60.magtech.com.cn/journalx_biotech/basicinfo/viewHtmlFile.action?id=23
[7] https://www.youtube.com/watch?v=27GJUtO5xxQ
[8] https://www.youtube.com/watch?v=FGhvZtgFiuU
[9] https://www.ee.cityu.edu.hk/~gchen/pdf/Writing.pdf
[10] https://www.youtube.com/watch?v=gNN92_JJs_Q
[11] https://www.youtube.com/watch?v=NWhVankmE2Q


