Content Menu
● Materials Needed
● Step-by-Step Instructions
>> Step 1: Prepare Your Workspace
>> Step 2: Melt the Spoons
>> Step 3: Assemble the Flower
>> Step 4: Paint Your Flowers
>> Step 5: Create Leaves and Stems
● Creative Variations of Spoon Flowers
>> Spoon Rose
>> Sunflower
>> Daisy
>> Multi-Colored Flowers
● Using Spoon Flowers in Home Decor
● Advanced Techniques
>> Adding Texture
>> Creating Bouquets
● Seasonal Themes
● Tips for Success
● Safety Precautions
● Conclusion
● FAQs
>> 1. Can I use other types of spoons?
>> 2. How long do these flowers last?
>> 3. Can children participate in this craft?
>> 4. What can I do with these flowers once they're made?
>> 5. Is there an alternative method if I don't want to use fire?
Creating beautiful flowers from disposable plastic spoons is a fun and eco-friendly craft that allows you to recycle materials while adding a touch of creativity to your home decor. In this comprehensive guide, we will explore the step-by-step process of making these charming spoon flowers, provide tips for customization, and include various design ideas.
Materials Needed
Before you begin crafting, gather the following materials:
- Plastic spoons (12-15 per flower)
- Candle or lighter
- Hot glue gun (optional)
- Acrylic paint or spray paint (in your choice of colors)
- Paintbrush (if using acrylic paint)
- Scissors
- Skewers or sticks (for flower stems)
- Green paper or felt (for leaves)
Step-by-Step Instructions
Step 1: Prepare Your Workspace
Make sure you have a clean, flat surface to work on. It's also advisable to work in a well-ventilated area due to the fumes from melting plastic. Lay down newspaper or a plastic sheet to catch any drips from the glue or paint.
Step 2: Melt the Spoons
1. Light your candle. Hold a plastic spoon about 1-2 inches above the flame.
2. Melt the spoon. Rotate the spoon slowly to evenly distribute the heat until the bowl starts to soften and curl. This will form the petals of your flower.
3. Shape the petals. Once softened, carefully pinch the edges of the spoon bowl to create a petal shape while it's still warm. Be cautious as it can get hot!
4. Detach the handle. After shaping, hold the handle over the flame until it softens, then twist it off cleanly.
5. Repeat for additional petals. You will need about 6-8 petals for each flower.
Step 3: Assemble the Flower
1. Create a base. Take one petal and place it upright; this will be your first layer.
2. Add more petals. Using either melted ends or hot glue, attach additional petals around the first one, overlapping them slightly to create a full flower look.
3. Secure all petals. Ensure that all petals are firmly attached and adjust their positions if necessary.
Step 4: Paint Your Flowers
1. Choose your colors. Use acrylic paint for a matte finish or spray paint for a glossy look.
2. Apply paint evenly. If using acrylics, apply several coats for vibrant color, allowing each coat to dry completely before adding another.
3. Add details if desired. Consider using contrasting colors for tips or centers of flowers.
Step 5: Create Leaves and Stems
1. Cut out leaves from green paper or felt.
2. Attach leaves to stems. Use hot glue to secure leaves onto skewers or sticks that will serve as stems for your flowers.
3. Insert stems into a vase or arrange them in a bouquet!

Creative Variations of Spoon Flowers
While the basic spoon flower is beautiful on its own, there are numerous creative variations you can try to make your flowers even more unique:
Spoon Rose
To create a rose, use red or pink spoons and shape the petals to be more rounded and layered tightly to mimic the look of a blooming rose.
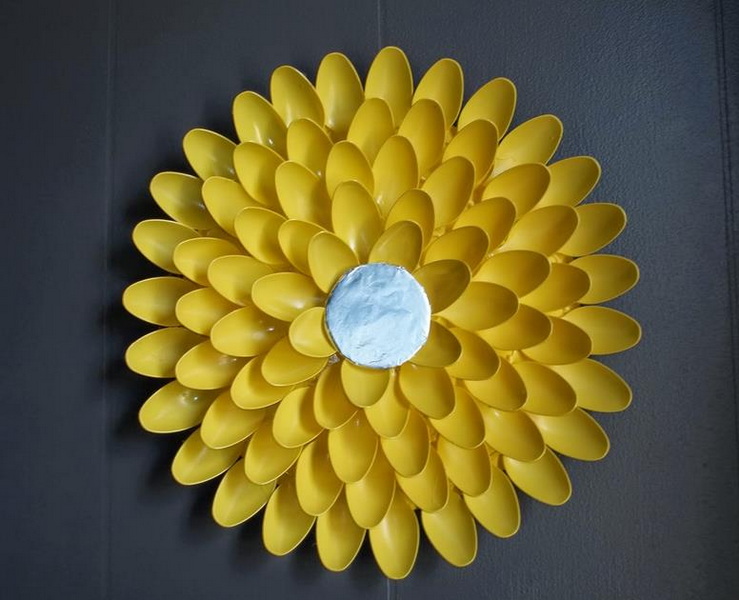
Sunflower
For a sunflower, use yellow spoons for the petals and a brown or black center made from a painted bottle cap or cardboard circle.
Daisy
To make daisies, use white spoons for the petals and a yellow center with elongated petal shapes for an authentic look.
Multi-Colored Flowers
Mix and match different colored spoons to create vibrant bouquets perfect for any occasion.
Using Spoon Flowers in Home Decor
Spoon flowers can be used in various ways to enhance your home decor:
- Vases: Arrange your spoon flowers in a decorative vase for a stunning centerpiece.
- Wreaths: Create a wreath by attaching spoon flowers to a foam or wire base for an eye-catching front door decoration.
- Wall Art: Glue spoon flowers onto canvas or wooden boards to create unique wall art.
- Gift Wrapping: Use spoon flowers as decorative elements on gift packages for an added personal touch.
Advanced Techniques
For those looking to elevate their crafting skills further, consider trying these advanced techniques:
Adding Texture
To give your flowers more depth, experiment with texturing techniques:
- Use crumpled tissue paper or fabric between layers of spoons.
- Incorporate natural elements like twigs or dried leaves into your design for an organic feel.
Creating Bouquets
To create an entire bouquet:
1. Make several spoon flowers in various colors and sizes.
2. Arrange them together with greenery from your leaves.
3. Secure them with floral tape and wrap with ribbon for added elegance.
Seasonal Themes
Spoon flowers can be adapted for different seasons and holidays:
- Spring: Use pastel-colored spoons and add butterflies made from paper.
- Summer: Bright colors like orange and yellow can mimic sunflowers.
- Autumn: Use warm tones like red, brown, and orange; add small pumpkins around your arrangements.
- Winter: Create white flowers with silver accents; add pinecones for texture.
Tips for Success
- Practice melting and shaping on spare spoons before creating your final product.
- Use gloves when handling melted plastic to avoid burns.
- Consider adding embellishments like glitter or beads in the center of flowers for extra flair.
Safety Precautions
When working with heat tools like candles or lighters:
1. Always keep water nearby in case of emergencies.
2. Work in an area free from flammable materials.
3. Supervise children closely if they are participating in this craft.
Conclusion
Making disposable spoon flowers is not only an enjoyable craft but also a great way to repurpose materials that would otherwise go to waste. With just a few supplies and some creativity, you can create stunning floral decorations that brighten up any space while also being environmentally conscious.

FAQs
1. Can I use other types of spoons?
Yes! While plastic spoons are most common, you can experiment with wooden or metal spoons as well.
2. How long do these flowers last?
If properly made and maintained, spoon flowers can last indefinitely as they are not perishable like real flowers.
3. Can children participate in this craft?
Yes! However, adult supervision is recommended during the melting process due to heat hazards.
4. What can I do with these flowers once they're made?
You can use them as home decor, gifts, party decorations, or even as part of larger craft projects like wreaths or garlands.
5. Is there an alternative method if I don't want to use fire?
You can use a heat gun or hairdryer on high heat as an alternative to melting with a candle flame.


